Use of HTML Forms
for Complex User Interfaces
to Server-Side Applications
Bertrand Ibrahim, Ph.D.
Computer Science Department,
University of Geneva
24, rue du General Dufour
CH-1211 Geneva 4, Switzerland
E-mail: Bertrand.Ibrahim@cui.unige.ch
Fax: (+41 22) 705 7780
Phone: (+41 22) 705 75 08
WWW: http://cuiwww.unige.ch/eao/www/Bertrand.html
Submitted to International Journal of Human-Computer
Studies, Special Issue on Innovative Applications of the
World Wide Web
Abstract:
It is now commonplace to use forms within HTML
documents to have server-based applications interact with
remote users. However, these forms are most of the time
rather simple and only allow a one time interaction between
the user and the application. Forms are nevertheless very
versatile and can be used to build rather complex user
interfaces to server-side applications that involve multiple
interaction loops. In this paper we will describe how we
used such forms to allow students to remotely control a
symbolic debugger executing algorithms that are described
in the on-line version of the book used in their data structure
course. After describing in detail how the user interface is
built and how the students can interact with it, we focus on
the limitations of this approach and we see how this
interface could be enhanced with the use of more recent
developments such as applets.
1. Introduction
Educators are often interested in using the latest technology
to help their students learn. It was therefore not very long
after the appearance of graphical WWW browsers that
educational material appeared on the Web. Initially, most
people saw the Web mostly as a medium to share
information worldwide and to link this information in a
hypermedia structure. But the introduction of forms in the
HTML syntax rapidly changed that point of view. Indeed,
the Web became then an interactive medium that would
take user input not just as a command to follow some
hyperlink, but also to feed some server-side application
with user-provided information.
Towards the end of 1993, we started a project that aimed at
providing our first year computer science students with
Web-based educational material that would help them with
their data structure course. Our intent was to put the book
used in this course [Ibrahim and Pellegrini
(1989)] in a
hypertextual form and allow the students to interactively
"play" with the algorithms that were described in the book.
The difficult part in the project was building a symbolic
debugger that could be controlled through a Web-based
user interface.
We presented a paper describing this project at the First
WWW conference, at CERN, in 1994 [Ibrahim (1994)].
This first paper focused on the technical implementation
details of the project, describing only superficially the user
interface. The present paper will on the other hand only
superficially discuss the implementation, focusing mostly
on the use of forms to realize a complex user interface.
2. Implementation overview
For sake of simplicity, the implementation strategy that we
chose was the following: the Pascal programs that we
wanted to demonstrate to the students would be modified to
include, between each original Pascal statement, a call to a
special procedure that checks for breakpoints and possibly
sends to standard output an HTML virtual document with a
form that corresponds to the program state. Other special
procedures have also been written to maintain a table of
symbols for all the variables and formal parameters of the
program so that their values could be included in the HTML
virtual document. All these additional procedures are
grouped in a separate module and can be reused for each
new program that we want to demonstrate.
Since code fragments found in the book are very often
incomplete programs, and given that we add procedure
calls to the original code, we built a simple mechanism that
allowed us to mark, in the final complete program, which
lines were part of the book example, so that only these
marked lines would be included in the HTML virtual
document and displayed to the student.
When a student, reading the on-line version of the book,
clicks on the  icon beside a code fragment, the URL
used does not actually correspond to an existing document,
but rather activates the Pascal program that will return a
form-based virtual document corresponding to the initial
state of the symbolic debugger (Fig. 1). This form is the
actual user interface through which the user will interact
with the program.
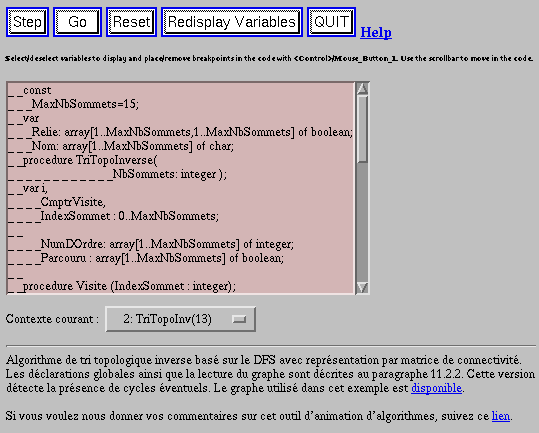
Fig. 1: Initial document presented to the user.
The Pascal program runs as a separate process and remains
"alive" even after it has sent the HTML virtual document.
It just waits for the HTTP server to reconnect to it. The form
sent to the browser includes, embedded in the action URL,
the process number of the Pascal program, allowing the
server to reconnect later to the program and send it the
information gathered from the form. The program can thus
resume its execution, based on the information provided by
the user (breakpoints, variables to display, etc.). The HTTP
server is thus just an intermediary between the user and the
Pascal program.
3. Detailed user interface
When the symbolic debugger is first started, the user is
presented with a form that contains various elements that
provide information through various kinds of input
widgets, and with most of which the user can interact
(Fig. 1).
At the top of the window, there is a row of command
buttons (Fig. 2) that allow the user to step through the
execution of the program. At the time this project was
implemented, "submit" buttons within HTML forms could
not have names associated with each of them to
differentiate them from each other. If we had used submit
buttons, the program would not have been able to tell which
submit button the user had pressed. We therefore used
image maps, even though we were not interested in the
coordinates of the mouse cursor within the button over
which the user clicked. We merely wanted to tell over
which button the user clicked. Input widgets of type
"Submit" can now include a "name" attribute that would
allow us to use them as command buttons instead of the
image maps described above.
 | (a)
|
<input type="image" name="BoutonContinue" src=".../BoutonStep.gif">
<input type="image" name="BoutonContinue" src=".../BoutonContinue.gif">
<input type="image" name="BoutonReset" src=".../BoutonReset.gif">
<input type="image" name="BoutonRefresh" src=".../BoutonRefresh.gif">
<input type="image" name="BoutonQuit" src=".../BoutonQuit.gif">
| (b)
|
Fig. 2: a) Image maps representing command
buttons; b) HTML syntax for the
widgets. The "Step" button advances
the execution by one instruction; the
"Go" button resumes execution till a
breakpoint is met; the "Reset" button
puts the debugger back to its initial
state; "Redisplay Variables" makes
the debugger refresh the display with
possibly newly selected variables;
"Quit" stops the Pascal program and
returns the user to the book section
from which the algorithm was started.
The code that is fed to the symbolic debugger and on which
the user can operate is represented in the HTML virtual
document as a multiple select input widget (Fig. 3). The
code that is shown there is not a complete program, but
rather a segment of code as it appears in the book used for
this course. Since there is not much control one has over
how a multiple select widget is displayed, we had to use
some tricks to have the code appear the way we wanted it:
the widget size is limited to 15 visible lines to have the
same footprint on the screen regardless of the length of the
code; the instruction at which execution will resume is
preceded by -> while all other instruction and declaration
lines are preceded by a sequence of underscore and space
characters to give some indentation to the code. Indeed,
web browsers ignore the leading spaces within multiple
select widgets, which would have resulted in a completely
not indented code if we hadn't used this stratagem.
| (a) | 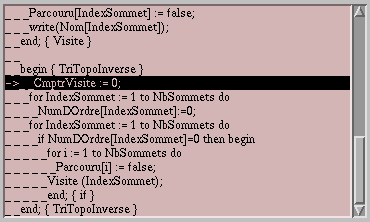
|
| (b)
| <select name="code" multiple size=15>
<option value="0002">_ _const
<option value="0003">_ _ _MaxNbSommets=15;
<option value="0006">_ _var
...
<option value="0069">->_ _CmptrVisite := 0;
...
<option value="0077">_ _ _ _ _end; { if }
<option value="0078">_ _end; { TriTopoInverse }
</select>
|
Fig. 3: a) Multiple select widget showing the code; b)
HTML syntax for the widget.
This multiple select widget allows the user to tell to the
symbolic debugger which variables to display and on which
instructions to pause (breakpoints). The user just clicks on some of the
lines to highlight or de-highlight them (Fig. 4).
If a highlighted line contains a variable declaration, it will
be interpreted by the debugger as a request to display the
content of that variable. If the line contains an instruction,
it means that a breakpoint should be set on that instruction.
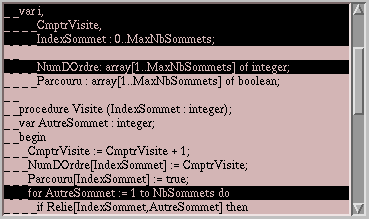
Fig. 4: Selecting lines in the code widget
defines breakpoints to stop at and
variables to display.
Once the user has set some breakpoints and selected some
variables, clicking on the "Go" button will cause the Pascal
program to resume execution until one of the breakpoints or
the end of the program is reached and then refresh the
display by sending a new virtual document to the Web
browser (Fig. 5).
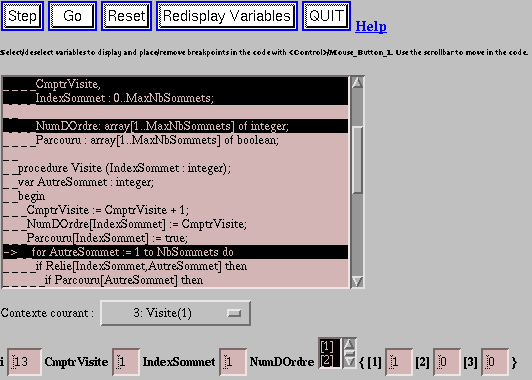
Fig. 5: After the user presses the Go button,
execution will resume till a breakpoint
is found. In this example, execution
stopped on the "for" statement.
Let's assume the student wants to see the content of one
more program variable, without going any further in the
execution of the program. This can be done by simply
selecting one more line in the "code" area, in which the
variable is declared, then click on the "Redisplay
Variables" button. The symbolic debugger will then send a
new document (Fig. 6) in which the newly selected variable
appears, in addition to what was already showing in the
previous document.
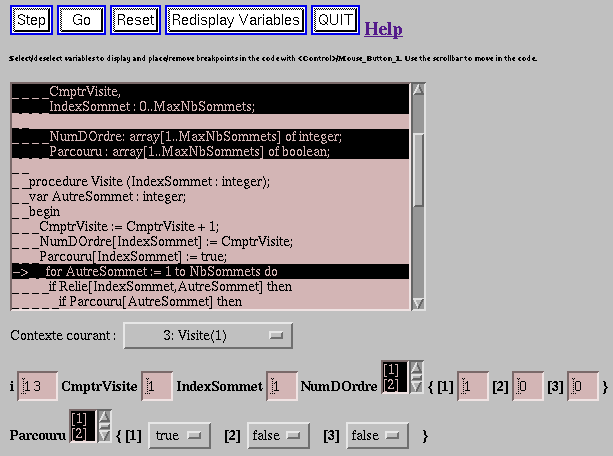
Fig. 6: The user selects one more variables and presses the
Redisplay Variables button.
Program variables are displayed with their names followed
by input widgets representing their values, so as to allow
the user to change them. These values might not, however,
be defined at the time the user asks for their display. In such
a case, the value field for numerical or string variables will
remain empty (Fig. 7), while undefined boolean variables
will appear with a "-" value (Fig. 8). Once a value has been
assigned to the boolean variable, the widget will only
include the false and true options.
| <img src="EmptyValueField.gif"> | <b>IndexSommet</b>
<input type="text" name="var0264" size=1 value="">
|
| (a) | (b)
|
Fig. 7: a) Representation of an empty numerical value
field; b) HTML code for the widget.
 | 
| <b>Bool</b>
<select name="var0282" size=1>
<option>false
<option>true
<option selected>-
</select>
|
| (a) | (b) | (c)
|
Fig. 8: a) Representation of an undefined
boolean variable; b) set of values of
the single select widget; c) HTML
code for the widget.
An array variable is represented with its name followed by
a multiple select widget showing its range of indices,
allowing the user to select the indices for the array
components that should be displayed (Fig. 9). Initially, the
first three components are selected by default. The
components are displayed, based on their types, like any
variable of that same type would be.
| (a) |  | (b)
| <b>NumDOrdre</b>
<select name="sel0265" multiple size=2>
<option selected value="0266">[1]
<option selected value="0267">[2]
<option selected value="0268">[3]
<option value="0269">[4]
<option value="0270">[5]
...
<option value="0278">[13]
<option value="0279">[14]
<option value="0280">[15]
</select>
|
(c) 
Fig. 9: a) An array is represented with a
multiple select widget. b) HTML code
for the array widget. c) By default, the
first three components are initially
displayed.
Records are displayed in a way very similar to arrays. The
name of the variable is followed by a multiple select widget
of size 2 showing the field names (Fig. 10). Each selected
field is displayed based on its type as would a simple
variable of that same type. By default the first three fields
are initially selected.
| (a) | 
|
| (b) | <b>UnSommet</b>
<select name="sel0071" multiple size=2>
<option selected value="0072">.v
<option selected value="0073">.Next
</select>
<b>{ .v</b><input type="text" name="var0072" size=2 value="4">
<b>.Next</b>
<select name="var0073" size=1><option selected>nil
</select>
<b>}</b>
|
Fig. 10: a) Records are represented with a
multiple select widget showing the
record field names. Each selected
component is then displayed based on
its type.
b) HTML syntax for the record and
components widgets.
Pointers are usually not represented as such, except for null
pointers that are represented by a single select widget
containing the single value "nil" (see "Next" field in Fig.
10). When the user selects a pointer variable, it is the
content of the pointed object that is displayed instead. For
dynamic data structures based on a record type, the fact that
the first three fields are pre-selected by default will often
mean that the whole dynamic structure will be displayed
whenever the user selects its head pointer (Fig. 11). In Fig.
11.a, "First" is a pointer, "First^" is a record with two fields,
among which Next is another pointer. "First^.Next^" is thus
displayed as a record with two fields. In this latter record,
the Next field contains a null pointer and is thus displayed
as a single select widget of size 1.
| (a) | 
|
| (b) | <b>First ^</b>
<select name="sel0077" multiple size=2>
<option selected value="0078">.v
<option selected value="0079">.Next
</select>
<b>{ .v</b>
<input type="text" name="var0078" size=2 value="3">
<b>.Next ^</b>
<select name="sel0074" multiple size=2>
<option selected value="0075">.v
<option selected value="0076">.Next
</select>
<b>{ .v</b>
<input type="text" name="var0075" size=2 value="5">
<b>.Next</b>
<select name="var0076" size=1>
<option selected>nil
</select>
<b>} }</b>
|
Fig. 11: When a pointer variable (in this
example, First) is selected, the whole
chain structure is displayed, given that
the referenced structure is a record
with two fields, v and Next. a)
Representation of the chain. b) HTML
syntax for all the components.
Another element of the user interface is the call stack,
displayed as a single select widget of size 1 (Fig. 12). Since
most of the algorithms examined in the course are
recursive, the user might want to (re-)examine the content
of some variables at various levels in the call stack. By
default, the debugger always displays variables as they are
defined in the deepest call stack level. The user can
however select another level and ask the debugger to
redisplay the variables as they were defined at that level.
 | Contexte courant :
<select name="contexte" size=1>
<option value="0000">1: Programme principal
<option value="0260">2: TriTopoInv(13)
<option value="0297">3: Visite(1)
</select>
|
| (a) | (b)
|
Fig. 12: a) The user can select from the call
stack the context based on which
values will be displayed. b) HTML
syntax for the widget.
One last element of the user interface is the input/output
window that appears as soon as the program executes a read
operation on standard input or a write operation on standard
output. This is actually implemented as a textarea widget
that is added after the code multiple select widget (Fig. 13).
More output is added to the textarea widget as output
instructions are executed by the debugger (Fig. 14).
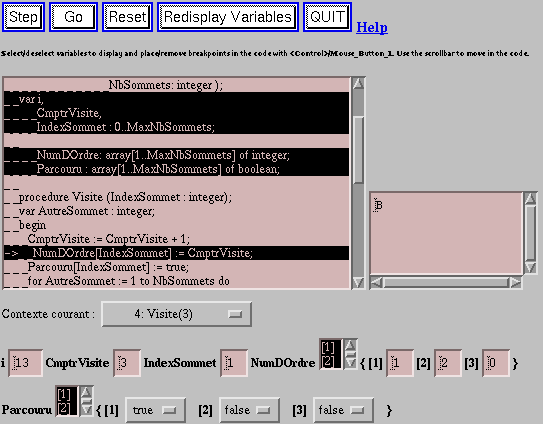
Fig. 13: The first time the program generates
output, an input/output window is
added beside the code widget.
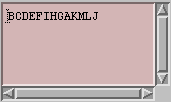
Fig. 14: Program output gets added to the
textarea widget as more output
instructions are executed
4. Pros and cons of the Web-based user interface
Because of a lack of resources, the HTML version of the
book is still not complete and there are for the moment only
two algorithms that have been prepared for demonstration
(see http://cuisung.unige.ch/std/11.5.html#TriTopoInv and
http://cuisung.unige.ch/std/11.6.html#FonctionVisite).
The major advantages in having used a standard Web-based
user interface are that the material is available to our
students from almost any location on campus (or even off-
campus), that it is usable on all the hardware platforms
available regardless of the installed browser, and that it is
easily combined with regular Web documents (indeed, all our installed
WWW browsers fully support forms).
On the down side, the user interface suffers somewhat from
some shortcomings of the HTML syntax. For instance,
because of the current form model, it is not possible to tell
to the browser which item in a multiple select widget
should be at the top of the visible area (assuming that the
widget has more items than its size allows to show), nor is
it possible for the server-side application to know how far
the user has scrolled through such a multiple select widget.
This means that it is not possible to "refresh" the display in
such a way as to have a specific interesting section of a
multiple select widget automatically visible. For instance,
in our case, we would have wanted the widget showing the
Pascal code to automatically scroll so as to make visible the
line where execution stopped.
More generally, many screen design issues are difficult to
resolve since there is no fine control over the widget
position in the display window. This is the price to pay for
portability and device independence. Actually, had the
HTTP protocol included the ability for the server to query
the browser for its document window size, it would been
possible to include in the server-side application more
sophisticated layout mechanisms. At some early stage, we
wondered whether our symbolic debugger should force a
line break after each variable display widget to make the
screen more readable. But we decided against it as screen
real estate is sometimes quite limited on some platforms
and adding line breaks might extend the length of the
virtual document beyond the size of the browser's
document window, thus forcing the user to often use the
browser scrollbar. The problem is that most browsers are
rather slow when they have to scroll documents that are
heavily loaded with form widgets.
Other concerns with our approach are related to timing
considerations such as response time depending on network
load and server load. We haven't had the opportunity to test
our demonstration programs from an off-campus site, but
response times for an on-campus client are usually within
one or two seconds, except for start-up time which is
around 10 to 15 seconds. In relation to server load, we have
integrated a timing mechanism in the Pascal programs that
are launched by the server so that they automatically time
out after a certain period of inactivity. Indeed, because of
the statelessness of the HTTP protocol, we could not be
sure that the "quit" command would always be invoked and
we didn't want to have a multitude of processes indefinitely
waiting until the user explicitly clicked on the "Quit"
button.
5. Technological alternatives
If we were to do now this project again from scratch, we
would have a much wider choice of implementation
solutions. Basically, the most promising alternatives
revolve around the use of applets. Indeed, various browsers
support the embedding, within an HTML document, of a
specific markup tag that makes reference to some piece of
code accessible over the Internet, that will be downloaded
by the browser and executed by a dedicated interpreter that
is part of the browser itself. The interpreter enforces a strict
security scheme that guarantees that the downloaded applet
cannot do any harmful operation on the client machine
without the user explicitly allowing it.
The most well known programming language for applets is
Java, supported by both the
Netscape browser and the
HotJava
browser. There is also an Ada
compiler that can
produce Java-compatible code. Less mature solutions
include the SurfIt browser
that can execute applets written
in Tcl,
and the Grail
browser that can execute applets
written in Python.
With all these alternatives, two main strategies can be
deployed to use applets to implement an improved version
of our symbolic debugger: the first strategy would still
involve a server-side application, but a client side applet
would allow us to implement a much more sophisticated
page layout that would adapt to the characteristics of the
client machine and make a more effective use of the screen
real estate. This solution would also allow a substantial
decrease in network traffic, as it would not be mandatory
anymore to send the HTML code for the whole user
interface after each interaction. Indeed, the server-side
application could just send update information that the
applet would use to change the content of the display. The
second strategy would be to have the symbolic debugger
run completely on the client machine as an autonomous
applet. This latter strategy would offer the maximum
flexibility, as it allows complete control of the screen layout
and doesn't suffer from any network latency or server
overload.
6. Conclusion
We have shown in this paper that HTML forms, as they are
now supported in almost all WWW browsers, are a
powerful enough mechanism to allow quite sophisticated
Web-based user interfaces. We have described in detail
how form widgets were used to build various user interface
components and then analyzed the advantages and
drawbacks of our approach. Finally, we tried to sketch out
how more recent developments such as applets could be
used to build even better user interfaces, without losing any
of the advantages of the form-based solution.
7. References
Ibrahim, B. (1994). World-Wide Algorithm
Animation.
Computer Networks and ISDN Systems, 27 (1994), 255-265.
Ibrahim, B. & Pellegrini, C. (1989).
Structuration des
donnees informatiques, initiation et applications. Dunod
informatique, Ed. Paris: Bordas. ISBN 2-04-018679-4
Site Hosting: Bronco
 icon beside a code fragment, the URL
used does not actually correspond to an existing document,
but rather activates the Pascal program that will return a
form-based virtual document corresponding to the initial
state of the symbolic debugger (Fig. 1). This form is the
actual user interface through which the user will interact
with the program.


